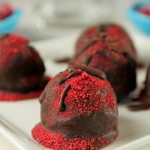
Paleo | Vegan Chocolate Raspberry Truffles
Servings 20
Calories 102kcal
Ingredients
Raspberry Truffle
- 1 ounce cocoa butter
- 2 tablespoons coconut oil or rainforest safe palm shortening
- 2 tablespoons coconut butter
- 1/4 cup coconut nectar or honey, or maple syrup. May add additional stevia or powdered Swerve for additional sweetness.
- 3/4 cup cocoa powder
- 1.2 ounces freeze-dried raspberries blended into a powder and sifted to remove seeds
- 2 teaspoons vanilla extract
- 1/8 teaspoon sea salt optional
Chocolate Coating:
- 1/2 cup cocoa butter
- 1/4 cup cocoa powder
- 4 tablespoons coconut nectar or honey, OR maple syrup. May add additional stevia or powdered sweetener of choice to taste.
Instructions
Make the truffles
- In a small saucepan over low heat, gently melt the cocoa butter and the coconut oil. Turn off the heat.
- Once liquified, whisk in the coconut butter until smooth.
- Whisk in remaining ingredients (remember to sift those seeds out first so as NOT to have that seedy crunch!)
- Taste the mixture and add more salt or sweetener if you like. I use powdered stevia if I want more.
- Pour into a bowl, place in the fridge to solidify (about 30 minutes or so). (If you are doing the rectangular or molded chocolate route, poor this warm mixture into your molds now and skip to step 7!)
- When the mixture feels cool and ready to handle, remove and begin your molding. To keep my hands clean, I used a small cookie scoop. Additionally, you could roll the mixture into bite-sized balls with your hands!
- Place back in fridge to firm up again while you prepare the coating, as necessary
For The Coating:
- In the same saucepan over low heat, melt the remaining cocoa butter and coconut oil.
- Once melted, remove from the heat and stir in the cocoa powder and coconut nectar.
- Taste and add more sweetener if you like.
- Using a toothpick or skewer, impale those waiting truffles and dip into the waiting coating. If you like your coating thicker, you will want the coating to cool a bit to thicken. I prefer my coating thin, so I start dipping right away.
- Let all the extra coating drip back into the bowl, and place on a Silpat or parchment lined cookie sheet to cool.
- Once solid, you can either drizzle some additional coating over the tops to dress them up or store them as is in an airtight container. These will hold at a cooler room temp (sorry South-westerners!), but I choose to store them in the freezer.
Nutrition
Calories: 102kcal | Carbohydrates: 6g | Fat: 9g | Saturated Fat: 5g | Monounsaturated Fat: 2g | Sodium: 16mg | Potassium: 79mg | Fiber: 1g | Sugar: 3g | Calcium: 12mg | Iron: 0.6mg