
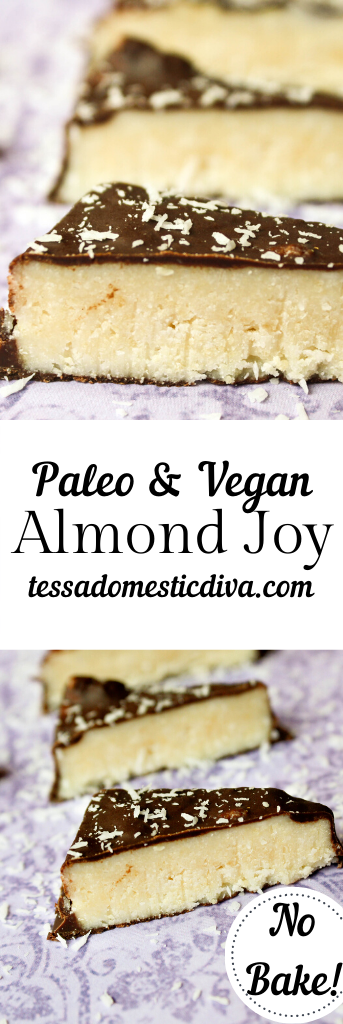
Homemade Almond Joy bars, or Mounds should you prefer the no nuts version!! These homemade almond joy bars are made with good for you ingredients and real food!!
Discovering the Coconut Secret Bar:
Dark chocolate? No sugar? Coconut? Meet the Coconut Secret Classic Coconut Bar.
I ran into my friend at the grocery store, and she was begrudgingly buying her husband a very expensive bar that he just loved and HAD to have: Coconut Secret Classic Coconut Bars.
While I was familiar with other Coconut Secret items, and love them all…I had yet to notice these. So I decided to buy one to see what all the fuss was about, and promised I would try to engineer a recipe if I liked it enough.
Liked it enough? No, that would not even begin to describe my feeling towards these bars.
The bars literally melt in your mouth, not too sweet, but a lovely dark chocolate coating setting the whole flavor through the roof. I am HOOKED!
But each bar is close to $3…ouch! Maybe because they are still too new?
Regardless, I had to try and recreate these beauties with a little reverse engineering….and succeed I did young Padawans! The force must have been strong with me on this one….and don’t hate me for putting something so divine in your face. Homemade mounds or almond joy bars will have you swooning!

If you like Mounds Bars or Almond Joy…well these are a very close cousin that are allergy friendly and made with real food ingredients only – their ingredients:
- semi-sweet chocolate, chocolate, corn syrup, sugar, milk fat, cocoa butter, coconut, salt,soy lecithin, PGPR, hydrolyzed milk protein, sodium metabisulfite, caramel color, sulfur dioxideto and milk).
My ingredients? All real food and nutritious.
Who wants loads of preservatives in their food anyways??!! Certainly not me! Especially when they are so east to make!

Why Fair Trade Certified Chocolate is Important
Whatever chocolate you choose, please select a Fair Trade Certified Chocolate. In this way, we can be sure our treats are NOT being created on the backs of children and their impoverished families. Please read more about why I choose Fair Trade Certified chocolate here. Or another great article here.
A couple of my favorite brands I regularly buy (there ARE MORE, LOOK FOR THE “FAIR TRADE CERTIFIED” LOGO):
If you love chocolate and coconut together, you may want to check out these other recipes:
- Raw Chocolate Macaroons
- Gluten Free & Vegan Toasted Coconut and Chocolate Cookies (Samoas)
- Low Carb Coconut Chocolate Fudge
- Dark Chocolate Coconut Butter Raspberry Cups

Paleo Almond Joy Bars Recipe:
Have you tried these paleo coconut chocolate bars? Tell me what you think by leaving a comment below!
Paleo Coconut Secret Bars/Homemade Healthy Mounds
Ingredients
- 4 cups grated unsweetened coconut
- 1/2 cup melted coconut oil
- 2-4 tablespoons coconut nectar I liked this best, however you could use real maple syrup, honey, or stevia
- Roasted whole or slivered almonds soaked/sprouted, optional
Coating
- 1 1/2 cups dark chocolate chips OR you can sweeten your own baking chocolatesquares-the ones with no sugar. I did a mixture of 6 ounces unsweetened chocolate/1/4 cup coconut nectar/40 drops vanilla creme stevia. Another great option is 1/2 cup food grade cocoa butter mixed with 1/2 cup cocoa powder and sweetener to taste, for low carb usepowdered Swerve.. I use about 2-3 tablespoons worth. I always add a dash of salt too.
- 1 tablespoon coconut oil
Instructions
- In a food processor, put the filling ingredients and process for several minutes. The mixture should soften and heat the coconut oil and the coconut pieces should begin to break down and move smoothly. The less time you process, the more chunky it will be. Some time is necessary so that the mixture will bind well.
- Taste for sweetness, add more if you like. Coconut nectar gives the mixture a slight tan coloring...just like the original!!
- Line an 8 x 8 or similar sized pan with waxed paper or parchment.
- Pour the coconut filling in and spread around evenly. If you would like to use almonds, now is the time. Press them in!
- Place the pan in the fridge or freezer to speed the solidifying process.
- Meanwhile, melt your chocolate with the coconut oil.
- Once solid, lift the whole chunk out by lifting the paper. Cut into desired shapes. Dip each piece in the chocolate, letting the excess drip back before laying it on A Silpat, parchment, or waxed paper to solidify. Store in an airtight container on the counter or in the freezer. Unlike most coconut oil delicacies, these are solid at room temp and travel well out of refrigeration, at least here in the cooler NW!
- SHORTCUT?: I have also done these the easy way by spreading the chocolate coating right over the top of the whole pan and forgoing the dipping process!
Nutrition
I’m going to have to start a keto diet regime due to allergies, so I’m on the hunt for some delicious recipes that won’t make me think I’m missing out so this recipe is just perfect. They sound delicious x
I had similar homemade healthy mounds at a restaurant recently and found myself craving it and wondering if I could recreate it today.
Oh my! These Homemade Healthy Mounds were delicious and so easy to make! Thanks so much, Tessa!
I think I mixed these TOO much….the oil and the coconut separated! I still threw everything in the freezer…hopefully they turn out.
So strange Jen, never had that happen! Was there a point where it was creamy?
317 Kcals… Is that with Coconut Nectar, Honey, Syrup, Stevia? Also what constitutes a serving size? 30 grams, 60 grams?
That was honey! Great question! The calorie calculator i used did not have coconut nectar 🙂
YES, yes, YES! Get in my belly! Mmm!
Wow, these are addictive. And so easy to whip up!
How long will they keep at room temperature?
Those look so tasty!!! Can you tell me how you count that with 21 day fix containers?
Hi Elodie!! I would count it as a healthy fat and a starch for the sugar!
O My Goodness Tessa! I finally made these today and they are A-MAZING! I wish I would have made them sooner 🙂
yay cassidy! I TOLD you!! now they are in your back pocket for whenever the mood strikes you!
These look da bomb! Did Di I just type that? This recipe is bringing out the old school in me. YUM! Pinned. =) P.S. Found you on Raia’s Recipes.
Congrats, Tessa! Once again you’ve got the most popular recipe from last weekend’s Savoring Saturdays! 😉 Can’t wait to see what deliciousness you share this weekend. 🙂
I am doing a Clean Eating Challenge right now and am in desperate need of desert that has no sugar and no dairy. This is perfect! You have been featured at the Let’s Get Real Friday Link Party,
then this is the treat for you marla!
Hi Tessa,
I always loved almond joy bars as a kid but of course haven’t eaten them for years. This sounds very feasible to make and sounds delicious. I think I am going to going to give them a try. Thanks for sharing on Real Food Fridays. Pinned & twitted.
These sound amazing! I’m so excited that I just put them in the freezer! A couple of changes I made based on what I have in excess: used chipped coconut, which broke down much better than I had expected (also added some coconut butter, which probably helped break it down a bit faster); will be using raw cacao with some homemade palm syrup for the coating (first attempt at trying the syrup! Wish me luck!)
I made these today and they are awesome! I followed your instructions to the letter, but used liquid sucralose as the sweetener. I’m allergic to stevia, and didn’t want the carbs from the other sweeteners you mentioned.
I used very dark chocolate chunks and only used 1/3 of a bag because I just “iced” mine. I had no trouble melting them in a glass measuring cup, zapping in the microwave 15 seconds at a time and stirring. It only took 45 seconds total (3 zaps) to get them warm enough to melt with some stirring.
Love these!! Thank you so much!
great adaptations Robin, Thank you for sharing!
These are delicious. I just use maple syrup & it doesn’t taste maple-y. My short cut, I use a spring form pan! Put a layer of chocolate on the bottom, coconut on next, then another layer of chocolate. Chill and then cut them. Maximum chocolate with minimal effort:-) I have also made it with just coconut butter (homemade or Let’s Do Organic creamed coconut) in place of the coconut & oil. It works just fine. Great easy dessert. Thank you!
I’m sorry but I just made these and found them awful! There was so much coconut oil that I felt like I may as well have been spooning it out of the jar & eating it solid.
I’m fairly sure I got the proportions right too, maybe just personal taste?
No need to apologize Jess! Hard to say what happened…but the final texture is not greasy at all, so not sure what happened with you batch. Individual taste always plays in for sure, but everyone I have made these for (all populations…even the processed food junkies!) really like them if they like coconut. Sorry hey didn’t work out for you…
Tessa, you know I will be making these! Everyone in our family loves coconut and chocolate so these will become a staple. I used to make homemade candy years (many years) ago, but when my daughter developed a dairy allergy, I just never thought of using an alternative to milk chocolate for candy making. You have just given me a whole new world to look out 🙂 Thank you for sharing in our recipe hop this month!
Wow, I am so happy I spent a few moments on Pinterest with my coffee this morning! There’s not much I love more than coconut and chocolate together. I’ve got a smallish food processor so will have to divide the recipe up in batches. I think everyone would love these at Easter.
Tessa, these look divine! I’m featuring them at Raw Foods Thursday tomorrow. Thank you so much for sharing them!
I’m not believing this. Just as I saw the link to this blog about how to make mounds bars, I was biting into one I just bought today! I don’t ever buy candy for myself but I had a hankering for that wonderful chocolatey coconutty taste and now it’s great to know I can make my own with no guilt.
Too funny Naomi…caught with your hand in the cookie jar! (: I love it! Please make these, I bet you’ll like them better!
Wow! Almost afraid to try…. I might eat the whole batch before anybody else tries them! Thanks for sharing, I found you on Make Your Own Monday.
Oh but you must BiggSis…as far as treats go…this is low on the naughty scale! Plus you’ll impress some friends!
Tessa, these as always look amzing! I like the idea of using the food processor, I’ve made similar ones before. 😉 Thanks for sharing with Natural Living Monday!
These look awesome. Hopped over from simple meals friday.
These are FANTASTIC! What a healthy treat! Thanks for the idea!
I LOVE Almond Joy bars, but don’t like that they’re mass produced. This recipe is perfect!
What else could you coat it with besides chocolate? I am allergic but I love coconut…. Any suggestions?
Hi Penny! I would reduce the coconut oil to 2-4 tablespoons and whistle mixture for about ten minutes. This will make a rough coconut butter, which will be much firmer at room temp. From here, you can add in Any sort of goodies, toasted nuts, cranberries, etc. while still warm and soft, spread into a bake pan, and let solidify. Should be easy enough to handle and at at this point!
my chocolate didnt come out right, it turned into a fudgy like frosting, maybe my simmer was too high? i melted 4oz chocolate with a little over a tablespoon of oil. that was melting then i realized i needed to put in the nectar & stevia. maybe i should have had everything in the bowl before melting? so i just spread the choc on the bar, but it doesnt stick to the bar well. oh well, the bars didnt turn out right either, too soft & crumbly. So i guess i will make fudge, i hope it turns out cuz i am outta time! wish me luck. merry christmas!!!
Yes, it sounds like you heated your chocolate to hot….gosh, how frustrating! I can insert my chocolate melting link into this post…seizing is a common problem when melting chocolate. So sorry this isn’t working out …..I am hoping my improved directions will help another avoid these pitfalls! Merry Christmas to you too Tammy.
i had the same problem as ronda…the recipe is 4 cups coconut to 1/2 cup coconut oil, is that correct? mine didnt pour, it was kind of like dough. is there clear coconut nectar? mine is brown so my miture is brown instead of white. anyway, gonna try again with 2 cups coconut to 1/2 cup coconut oil, etc. merry christmas!!!
Hi Tammy! Thanks for your feedback! I have tweaked the directions….they were obviously lacking! My guess is that you did not process long enough. What brand of processor do you use? The original bars DO have a brown tinge…if that is bothersome to you, just use honey…but I love the flavor of the nectar here! I also added the chocolate ounces for you….
hi & thanks for a great HEALTHY recipe! the 6 squares of chocolate for the coating – what size squares? i have a 4oz ghiradelli 100% cacao bar. thank you!
I was wondering if I could use coconut butter in this recipe?
I couldn’t get the unsweetened coconut quite as hydrated? as I’d have hoped. I used 2 cups unsweetened coconut (kroger bag), 4 Tbsp coconut oil, 4 Tbsp powdered sugar. I just smeared some melted dark chocolate chips/bit of butter onto a silpat (5″ square maybe), smeared the little bit runny coconut mixture on top and popped that into freezer. When it hardens, I’ll smear some more chocolate on top. I might just peel it off and eat it myself. I might cut it into cubes for myfamily to try.
Hi Rhonda! Do you mean it would not hold together? Not sure what you mean by hydrated….do you mean incorporated? Were you using a food processor? This recipe was not meant to puree the dried coconut, but if you like things more smooth, it would mean a much longer run the processor to pulverize those coconut shreds a bit more. I don;t think it can get 100%smooth in a processor though, a blendtec or vitamix…sure! The mixture SHOULD be runny initially, that is the nature of coconut oil when warm, it is a liquid. But as it cools to room temp or in the fridge or freezer, it hardens and pulls everything together. I like to use a form so the mixture doesn’t spread out of it’s own accord..but that is pure aesthetics…Thank you for your comment, let me know if I can help more!
Hi Melanie..I bet coconut butter would be fabulous too!! It would replace the oil and grated coconut….
I just made these and they are SO good! I subbed half of the coconut oil in the filling with melted coconut butter, Artisana brand. I put them in mini muffin liners with about a half teaspoon of chocolate on the bottom and a generous teaspoon of filling then chocolate on top- dark chocolate of course! Love it!
Great technique Stacy, and THANK YOU for taking the time to submit feedback…it makes my day to hear back on how a recipe works for people!
Hi Tessa, finally getting around to making these since I almost cried when I purchased four bars at New Seasons for $10, OUCH! Thanks for creating this recipe. Shane and I are forever indebted. Miss seeing you. Let’s play soon!
Oh yay Nina!! We would love to come over any morning and meet your new little one!
What kind of chocolate? Is it bittersweet, semi-sweet or unsweetened? Thanks
Hi Kay! I use the darkest chocolate possible (75% and up), or make my own using unsweetened chocolate sweetened with coconut nectar and stevia. I have also melted some unsweetened chocolate squares WITH dark chocolate to cut the sugar even lower…it’s all up to personal taste! Hope that answers your question….
Ok, I just *had* to try the original bar, before attemting this recipe, so I tracked them down. I bought both the classic and the mint.
I’m totally stumped. I was expecting them to be white inside? These are brown. Like the cookie part of a chocolate chip cookie. They aren’t out of date. Is this what they are supposed to be like?
Still looking forward to trying your recipe, though! Yours look waaay better!
Hi thia! It is tannish In color from the coconut nectar. I have never had the mint, so I don’t know for sure on that one…mine might be lighter because I use less of the nectar in my recreation…
good to know. Thanks!
I love these bars Tessa, yum!
Thank you Vicky, we sure do too!! Minus my coconut averse daughter that is…crazy girl, who doesn’t like coconut! I made a convert out of my husband….
Oh, my, these look amazingly good! Mounds has always been a most favorite candy. I’ll be trying these very soon!
Enjoy Buttoni…thanks for stopping by!
Thanks so much. That will make all the difference. I can’t wait to get some of this coconut and try this again.
Loved this idea, but I can’t get the coconut filling to hold together. What type of coconut did you use–frozen, fresh, canned, bagged? I tried with frozen, and I believe it was entirely too soggy to ever hold together. It is delicious eaten with a spoon though!
Hi Shelly! This recipe calls for the dried unsweetened, grated coconut. I used Let’s Do Organic (i just added a link to the product so you could see it if you’re visual!). You’re right, the frozen has much more moisture, so i can bet it did not hold together. I hope the link helps clear the confusion for you!
I just made these!! Oh my goodness they are heavenly! I am going to hide them from everyone in my family! Mine do not look quite as pretty since my chocolate siezed a bit so I just dolloped it on top of each piece instead of coating. But no worries they will be devoured beautiful or not! Thank you for this! My daugther cannot eat soy, dairy or gluten so this will be a delightful surprise for when she gets home after school today!
Oh great Jodie, I am so glad you love them! I have actually made them by just spreading the chocolate right over the top and skipping the dipping step when I am feeling lazy. They are not quite as clean to hold, but just a delicious!! Thanks for so much for stopping by and letting me know!
This recipe looks so good, I love chocolate candy! =)
I love anything chocolate…the good stuff at least!
Thanks so much!!!
These look so good~ can’t wait to try them! Over from Better Mom 😉
we certainly love them here Mandy, thanks for stopping by!
I must buy the ingredients. I have a huge jar of coconut oil waiting for a recipe!
well then THIS is the perfect recipe! I ‘ve got lots of coconut oil recipes on my blog if you need more inspiration, or you can just ask me!
Oh Yeah – coconut and chocolate, must make these soon!
OMG! These look Amazing! Must try! Thank you for posting! 🙂
these bars look amazing.. so pretty and i bet delicious!
These look amazing. So simple! Chocolate and coconut are amazing together!
Gabby
omg. i would like to eat one of these right now! seriously. its been so long since i've had a mounds. 🙂
this is brilliant! I'm lookign at the ingredients and can't believe it's so simple yet so delicious!
Looks yummy! I pinned it.
Oh good land, this recipe just looks spectacular! I have been on a serious coconut kick lately. We are making this. I will report back.
These look unbelievable!! Mounds are one of my favorite flavor combos! I need to make these asap! Thanks for sharing, I found you via Wheat Free Meat Free's weekly roundup!
Awesome looking dessert – coconut & chocolate are the best!
Be still my beating heart!I just tried one of those bars this morning and it was A.M.A.Z.I.N.G. I was so sad that they are so expensive! Now you'd provided me with a recipe! I can't wait to try it! Thank you!Now I'm off to hunt down Coconut nectar….
Incredible Tessa! I think I know one of the things the Easter Bunny is bringing this year. The whole family will want to eat these!!!
Okay, you literally made my mouth water with this one 🙂 Your coconut secret bars look SO good! What a contrast between your wholesome ingredients and all the much more questionable ones in the store bought version too. Thank you for sharing this recipe.
Don't you just LOVE it when it works out! Well you did in again Tessa! Great recipe. My husband is a freak about coconut and chocolate – his favorites as a youngster were the Mounds and Almond Joys. This looks so easy and fun Tessa!Hugs,–Amber
Wow! Those look so amazing! Thanks for the recipe!
Yummm…need I say more?
Yum. These look wonderful. And your new design does too! 🙂
Wow! I am kind of in love with this recipe!